Are you on a weight loss journey or do you just love all things fitness? Do you want to share everything you’ve learned with other people?
You can definitely combine your love of fitness and your love of helping other people by starting your own fitness blog.
I started Easy Living Today 2.5 years ago when I was 7 months pregnant and preparing for my postpartum journey. Now, blogging is my full time job and has replaced my full time income.
Since I get asked about blogging a lot, today I’m going to share how to start a fitness blog in 4 easy steps!
All it takes is 15 minutes to follow the simple steps below and you’ll be up and running, ready to start your blogging journey along side your fitness journey.
Step 1: Domain Name and Hosting
The first thing you’ll want to do is head over to SiteGround to chose your website name (domain) and hosting plan.
The domain name is what everyone is going to know you by and the hosting plan is basically like renting your little space on the internet to display your blog.
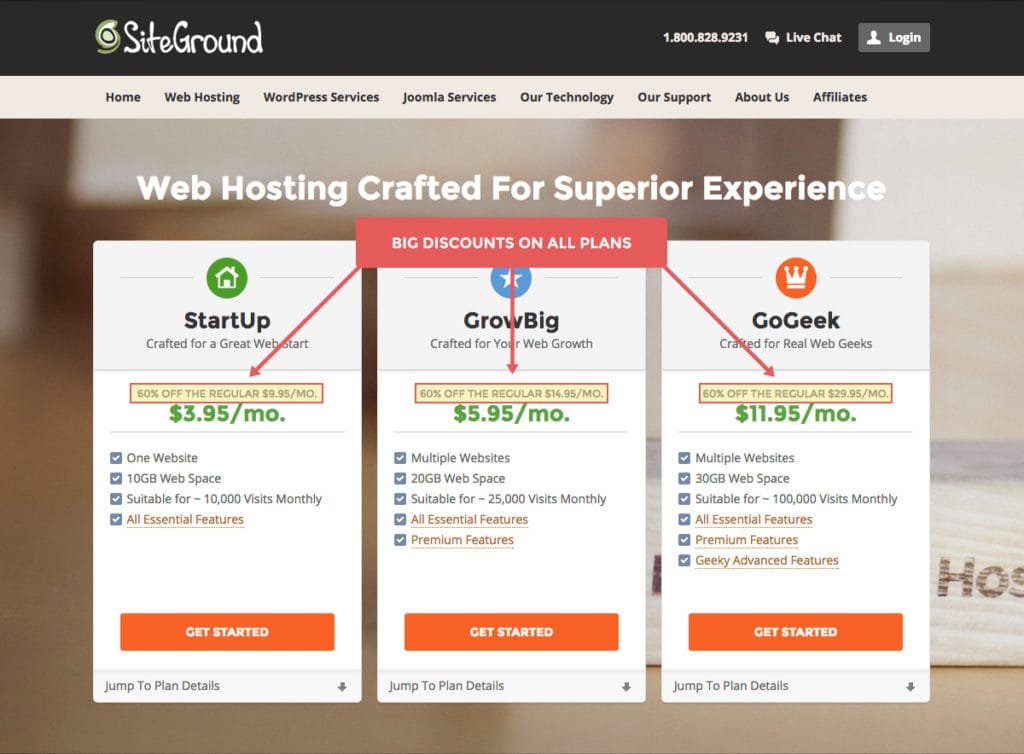
When you get to the SiteGround website, you’re going to scroll down a bit and click on “web hosting.” That’ll get you to the page you see below, where you get to pick your web hosting plan.
Since you’re just starting out, I recommend the StartUp plan for just $3.95/month.
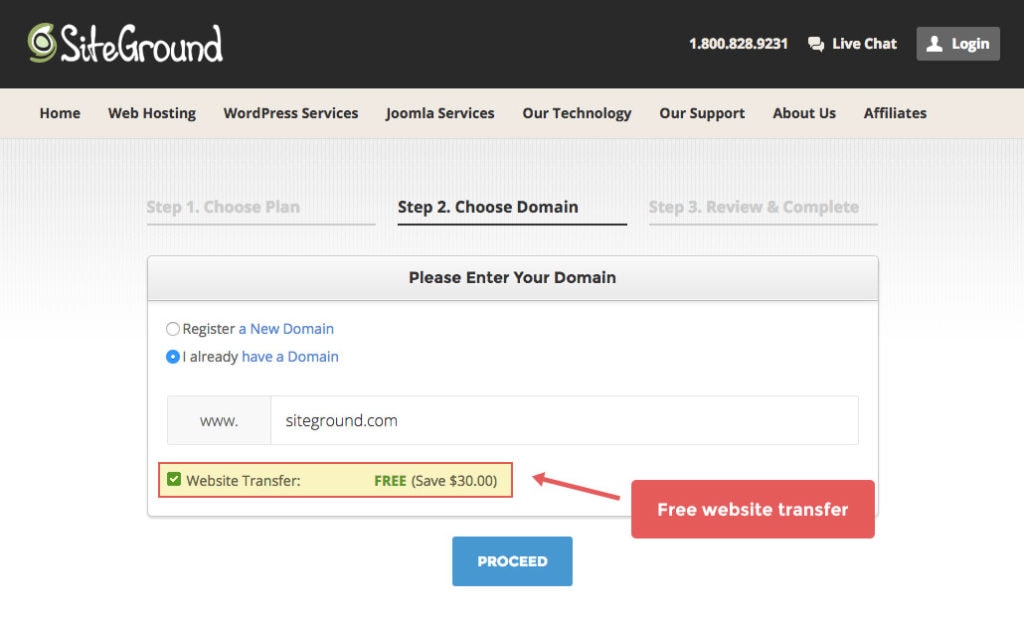
Then you are going to click on the “Register a New Domain” button and type in the website name you want. It will then tell you whether or not it’s available after you hit the “proceed” button.
Then you can chose to register your domain name for just $14.95/year by hitting the proceed button again.

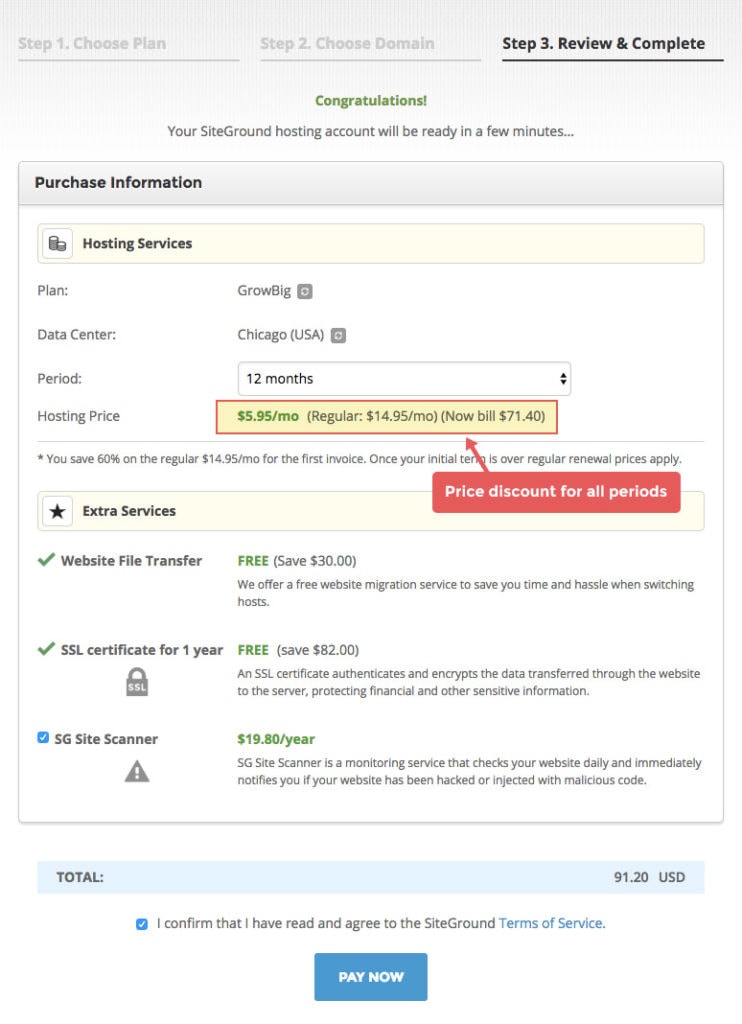
Then you’ll go to the “Review & Complete” page where you can make sure everything looks good, decide if you want any extras, review the pricing (the one below is for the GrowBig plan, not the StartUp plan, so yours will look slightly different) and checkout!

Step 2: Installing WordPress
Now that you have your hosting set up, you will want to connect it to WordPress.org (not .com!). Here’s how:
- Log in to your SiteGround account and click on the orange button that says “Go to CPanel.”
- Scroll until you find the “Auto Installers” section and click on the WordPress logo button.
- Click the install button on the next page.
- Under “protocol,” be sure to select https. Then select the domain name you are installing. Leave the directory box empty.
- Fill out the rest of the page the way you want your account setup and you’re done!
** Make sure you write down your admin URL, username and password- this is how you’ll log in! Try logging in right away to make sure everything is working.
Step 3: Design Your Blog
You officially own a blog, woohoo! Congratulations!
In just a bit, you’ll be able to start sharing fitness tips, recipes and your own journey!
But first you’ll want to make sure you have a pretty place to do all of that. That means it’s time to pic your theme!
WordPress has a bunch of free themes you can chose from, so make sure you look through those.
If you want something fancier and more premium, I recommend getting the Genesis framework with a StudioPress theme.
Step 4: Start Writing!
Now that your blog is set up, it’s time to start writing!
To write a blog post, all you have to do is log in to your WordPress site, click on “Posts” on the left hand site and then click add new.
This is where you will let your creative juices flow and where you will give your best fitness tips, share pictures and/or recipes… or whatever else you want!
Have fun, be yourself and write on!
And that, my friends, is how to start a fitness blog!
Need More Help?
I really wanted to keep this as simple as possible for anyone wanting to start a blog, but if there is anything else you want information on or need help with (like how to monetize, fitness post ideas, SEO, blogging basics, etc)- let me know in the comments and I can look in to writing more posts on this.


